
 |
|
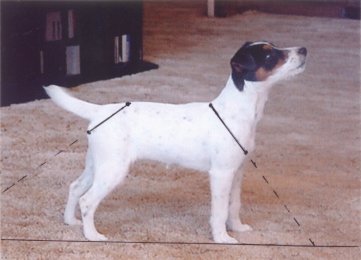 |
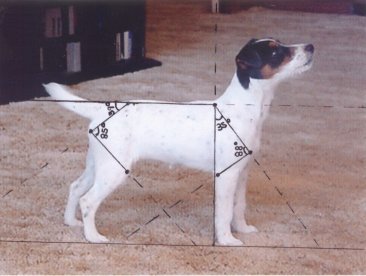
MEASURING ANGLES
ON A PHOTOGRAPH (Note: The photograph needs to be a direct side profile taken at the level as the dog) Step #1 Draw a line along the bottom of the feet closest to you. Step #2 Put a dot on the top and the front point of the shoulder, also called the scapula. . Step #3 Put a dot on the top and the rear point of the pelvis bone. Step #4 Attach those dots with the lines extending down to the bottom horizontal line. |
 |
Step #5 Using your protractor that has a
hole at the bottom center,
put the line that goes through the hole on the horizontal line you drew on the picture. Move the protractor from side to side (not getting off the horizontal line) until the 90 degree mark at the top is directly above the top shoulder dot. Put a new dot in the hole that is on the horizontal line and another dot above the 90 degree mark. Step #6 Attach those 2 new dots with a line. This new line will be vertical and perpendicular to the bottom horizontal line you drew in Step #1. Step #7 Turn your protractor sideways so that the line the hole has through it is now on top of the vertical line you just drew. Put the hole over the dot that was at the top of the shoulder making sure the line that goes through the hole is still on top of the vertical line. (The line you drew from the dots in Step #2 will tell you the angle of this dogs shoulder) Acceptable angles are from 30 to 45 degrees depending on how close you were to getting the dots on the right points. |
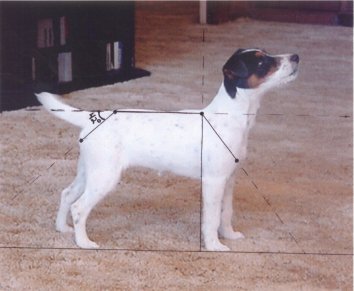 |
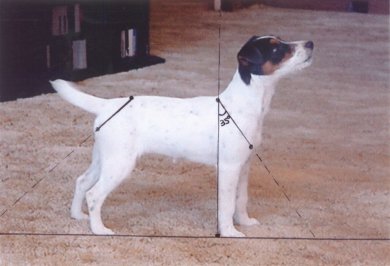
Step #8 Draw another horizontal line attaching the
dots of the top of the pelvis and the top of the shoulder. (This line should be directly on top of the pelvis dot and just slightly below the dot on top of the shoulder) Step #9 Turn the picture up side down and put the hole in the protractor over the dot on top of the pelvis. Line up the protractor line that goes through the hole along the new horizontal line you just drew in Step #8. The line that goes from the dot at the top of the pelvis, through the dot at the rear point of the pelvis will give you the angle of the pelvis. This angle should be approximately the same as the shoulder angle. |
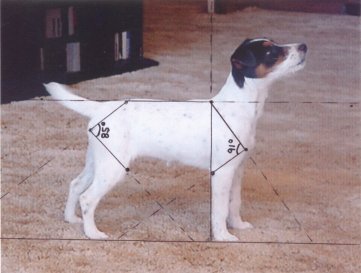 |
Step #10 Put a dot on the point of the stifle.
Step #11 Draw a line from the dot at the rear point of the pelvis bone to the dot on the point of the stifle. (This "L" shaped angle should be between 80 - 90 degrees, depending on how close you got your dots to the required points) Step #12 Put a dot on the round bone, just in front of the elbow. This is the lower end of the humerus. Step #13 Draw a line from the dot at the front point of the shoulder to the round bone. This line represents the humerus, or upper arm. (This "L" shaped angle should also be between 80 - 90 degrees depending on how close you got your dots to the required points) |